What does it mean to pasteurize cans of blanks. How to sterilize glass jars at home
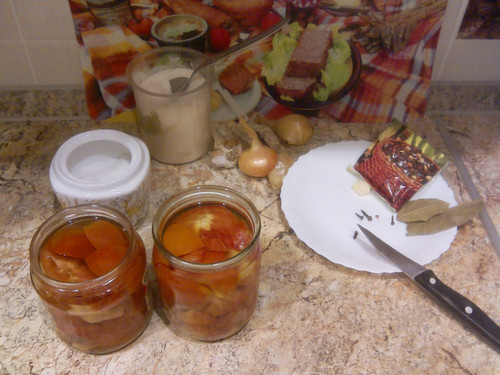
I love easy recipes that don’t steal a lot of free time. But I really liked Giacomo’s neighbor’s tomatoes. This year I decided to do it, and in the recipe, tomatoes in jars should be sterilized. .Sharing with you!
Pay attention! Since pasteurization is a more gentle method of heat treatment of canned food than sterilization, you will spend more time on it, but you will get more attractive-looking blanks, because during pasteurization, tender fruits retain their shape better, as they are less boiled.
How to sterilize canned food gas oven. This sterilization method, previously used primarily for the heat treatment of jars with glass lids and metal clips, is being used more and more frequently, including the sterilization of jars with conventional tin lids. Compared to the water sterilization method described above, it is less troublesome. Its only drawback is that it is extremely difficult to sterilize large jars in this way. There are two ways to sterilize filled jars in the oven: 1) by simply placing the jars on a wire rack; 2) on a baking sheet with water. You can figure out how to put the jars on the grate without me, and for the second method, fill a deep baking sheet with hot water by 2 cm, place filled jars on it, covered with sterilized lids or closed lids, reinforced with clamps. After that, put the grate or baking sheet with jars in an oven heated to 100 ° C, then increase the temperature to 140-180 ° C and sterilize. It is best to use this method to reduce the sterilization time for items that require a long heat treatment, such as caviar and other similar snacks. Time is saved due to the fact that the oven can be set to a higher temperature - accordingly, the sterilization time is reduced. For example, about 15 minutes will be enough to sterilize a liter jar of caviar (the usual time for its sterilization is at least 1 hour).
Pay attention! The time for sterilization of canned food in the oven does not correspond to the time indicated in recipes for sterilization in boiling water, it is usually selected empirically in accordance with the size of the container, the method of preparation and packing density of canned food, the properties of raw materials, as well as the individual capabilities of the oven itself. Since ovens are different for everyone, before deciding to switch to sterilizing canned food in this way, carry out a control sterilization of one jar, carefully watching the process through the oven window. Write down all your observations, including minute-by-minute timing of what is happening in a filled jar. It is especially important not to miss the moment of boiling - at this time, rising bubbles appear in the filling or begin to stir upper layer thick workpiece. The sterilization time is considered, as usual, from the moment of boiling.
Pay attention! When sterilizing jars in a gas or electric oven over a long period of time, the sealing rubbers under the influence of high temperature can be damaged. Therefore, it is better to sterilize in a pan with water. In this case, when heated, water vapor is formed, which protects the gum from drying out. In addition, water vapor is a better conductor of heat than dry air, so the contents of the jars will warm up faster - accordingly, the sterilization time can be reduced.
How to sterilize canned food in an electric oven. This method is quite convenient and simple for sterilizing small jars, if there is no other way to do it faster. Its disadvantage is that sterilization takes longer than usual, and most importantly, it is difficult to accurately set the temperature and end time of the process. In addition, the consumption of electricity increases. To sterilize filled jars in an electric oven, place them on a dry baking sheet or in water poured into the bottom of the baking sheet with a layer of 2 cm and place it in the oven as low as possible. Banks can also be placed directly on the bottom of the oven, but first it must be warmed up a little by turning on the lower heater for 10 minutes. Before placing a jar on the bottom (under) the oven, cover it with a wet cloth so that water vapor forms during the sterilization process. When installing jars, remember that there should be a free gap between them so that they can heat up evenly over the entire surface. According to the width of the hearth, 2 are placed in one row liter cans. If you install more, they will be too tightly pressed against each other. 4 liter jars are placed along the oven, and thus 8 liter jars are sterilized at the same time. Half-liter jars can be placed in two tiers - this will allow you to immediately sterilize 16 jars. When adjusting the temperature, keep in mind that since the warm air is held at the top, it is not practical to leave the top heater on all the time. If this is done, then after some time the upper layer of air will heat up to a temperature of 130 ° C and above, and the lower one - only up to 70 ° C. In this case, the top row of half-liter cans will be overheated, and the bottom row will not be heated enough. To avoid this, turn on both heating devices at the same time, and after 20-30 minutes turn off the upper device, leaving only the lower one on. If you need to sterilize half-liter jars installed in two tiers, first turn on the upper device for 20-30 minutes, and then turn it off and continue heating for 5-10 minutes, turning on the lower device. In order to more accurately determine the time, in the process of sterilizing the first batch of jars, 20 minutes after turning off the lower appliance, take one jar out of the oven, quickly open it, measure the temperature of its contents and evaluate its condition. Depending on the height of the temperature, the consistency of canned food and the appearance of the fruit, proceed as follows. If the temperature in the jar is below 70 ° C, turn on the lower device for 15-20 minutes, otherwise the workpiece will not be completely sterilized; if the temperature is above 70 ° C, pay attention to the condition of the fruits (their firmness and general appearance) and decide how long the further sterilization should be. After determining the temperature of the contents of the jar, cover it again as soon as possible and put it back in the oven for at least 20 minutes.
Pay attention! Remember that the process of temperature control in an electric oven depends on the number of cans and the type of canned food. The more cans are sterilized, the longer the lower heating device is turned on. And keep in mind that the fruits and berries, which are quickly boiled soft, are sterilized for a short time, and at the end of the sterilization process they are left in the switched off closed oven until completely cooled.
Pay attention! When sterilizing compotes and other canned food with filling to control the temperature, use a jar of water covered with a lid or parchment paper (control jar), placing it in the oven along with filled jars. Considering that water heats up faster than filling, you can determine the temperature in a jar of compote without taking it out of the oven. After measuring the temperature of the water in the control jar, you will only have to make simple calculations, based on the fact that the temperature in the jars with compote at this very time will be about 5 ° C lower.
Julia shares her experience:
I don’t remember that a friend once told me how she cooks blanks in the oven. I looked on the Internet, remembered the advice of a friend, and I can boast that I saved a lot of time. It’s not that everything is done much faster in the oven, but you don’t have to stand over it and steam like over a pan, plus a much larger batch is placed in the oven, and this makes things much easier. All in all, here's what I got:
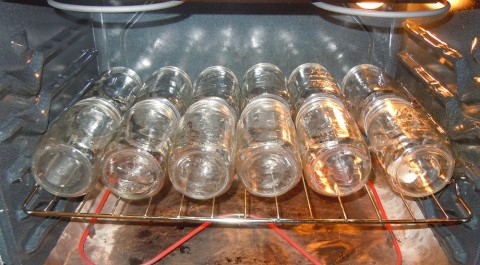
First of all, we sterilize jars with lids in the oven. If you already have dry, clean jars ready, then you can skip this step. The jars with the contents will still go back to the oven later. But if you just washed the jars with lids, then it is better to dry them / sterilize them in the oven first.
We put the jars with lids in the oven and turn on a low temperature of about 200F or 100C. If the jars need to dry, it's better neck down, but my grate is wide and the jars fall through, so I just put them on their side.
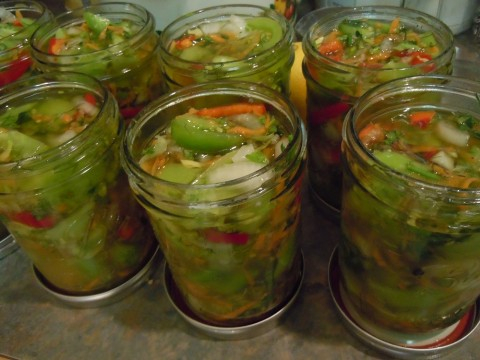
While the jars are being sterilized, we take on blanks: cucumbers, tomatoes, salads for the winter and everything else that you process this season.
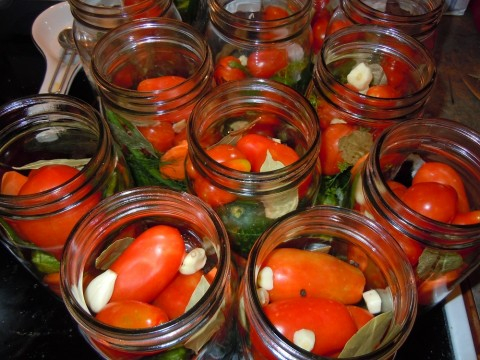
Now we take out the jars and fill them with contents. If necessary, fill with hot brine or marinade. On each jar, we put a lid on top, but do not twist it. Leave the oven off or at a low temperature.
And now we act as follows:
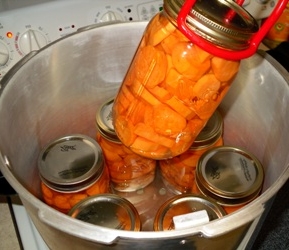
Place an iron baking sheet on a wire rack in the oven. We put jars with lids on a baking sheet and pour hot water (I take it from the tap) 3-4 cm into the bottom of the baking sheet.

Close the oven and raise the temperature to medium - 180C or 350F. The blanks must be placed in a cold or slightly heated oven so that the jars do not burst due to temperature changes.
(In many recipes, I read that blanks are placed without a baking sheet directly on the wire rack. I decided to try it, but missed it, and oil marinade, having boiled, ran from the cans directly to the red-hot spiral. As you know, it is better not to add fuel to the fire. I will not go into details, but since then I have only rolled up jars on a baking sheet with water. I feel more comfortable working in the kitchen this way.)

Pasteurize as directed in the recipe. I'm not in the category that keeps track of time/size/temperature. I just leave everything in the oven for 15-20-30 minutes. until the blanks boil well for a while.
And now carefully take out each jar. In this case, you need to adapt with a good grip or mitten. Screw on the lid tightly and turn over. We wrap the inverted jars with a blanket or towel and leave to cool. Maybe a step with a blanket is superfluous, but I sleep better this way. What difference does it make in what form the banks cool down, so let them stand upside down under the covers according to all the rules.
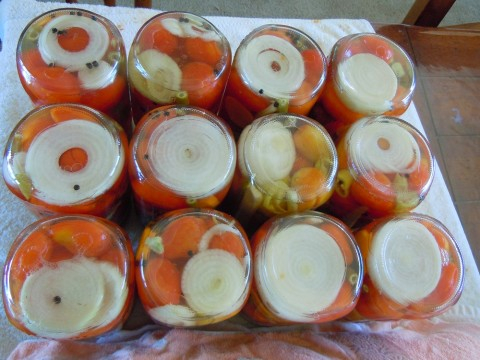
Banks rolled up in this way can be stored without a refrigerator for years. We certainly have enough to share and treat for several years to come.
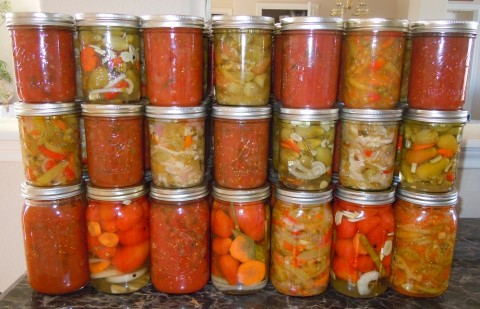
I also noticed that the marinade from cucumbers and tomatoes prepared in the oven does not become cloudy as usual, but remains transparent.
I read another piece of advice for the future somewhere on the Internet - if a random jar swells up, then pour a tablespoon of salt on the lid. After 2-3 days, the bank will return to normal. I don’t know what the secret is, but I wound the advice on my mustache
It turns out that everything is not as difficult as it seems. All the tomatoes have safely settled in the jars and in the refrigerator a very small last saucepan is waiting for me.
How to sterilize and pasteurize canned food in a water bath.
These methods of heat treatment consist in heating the jars with future canned food in them in a water bath, or simply in a saucepan with hot (pasteurization) or low-boiling (sterilization) water. Each type of canned food has its own heat treatment mode, which is always indicated in the corresponding recipe. However, regardless of whether sterilization or pasteurization is supposed to be carried out for 5 or 50 minutes, this must always be done in a certain sequence:
Take a large saucepan with a wide bottom, which can fit several jars of the same size. Place a wire rack on the bottom of the pot and cover with a cloth. If you do not have such a grill, you can use a thick pad from a kitchen towel folded in 3-4 layers;
Pour hot water into a saucepan or heat cold water. Its level depends on the capping method (for the most common method of capping with metal lids, water is poured to the level of the blank in the jars). But considering that when placing the cans in the pan, some of the water will be displaced, just in case, pour a little less water, and keep a kettle of boiling water on hand to add it to the pan if necessary;
So that the glass jar that you put in hot water does not burst, the temperature of the water should not be higher than the temperature of the contents of the jar, at least not higher than 10-15 ° C. If it is not indicated in the recipe, first heat the water to 35-75 °C. This is not a typo: such a large difference in temperatures is due to the temperature of the contents of the jar - the colder it is, the lower the temperature of the water in the pan should be. So, vegetable salads are laid in jars cold - they need water with a temperature of 35 ° C, and compotes, natural canned food and marinades are poured with boiling or hot fillings - they need hotter water;
Place the jars on a stand so that they do not collide with each other and with the walls of the pan (the gap should be at least 5-10 mm) and cover them with sterilized lids. Keep in mind that in one pan you can pasteurize or sterilize jars of only one size;
Now you can pour required amount water from the kettle, so that the level of water in the pan with the jars installed in it corresponds to the filling level of the jars, but is not lower than 3 cm from the top of the jars themselves;
After the jars are installed, cover the pan with a lid. Then gradually heat the water to the temperature indicated in the respective recipe and keep it for the set time without stopping the heating. Remember that the water in the pan should in no case boil violently;
The time of pasteurization and sterilization (indicated in the recipes) starts counting only from the moment the water temperature required in the recipe is reached. Use a thermometer to measure it;
Once you have completed the pasteurization or sterilization process, begin removing the jars from the water and sealing immediately. Do it quickly and carefully: without removing the lid, grab the jar by the neck with a special clamp (tongs) or potholders, transfer it to the table and quickly seal it with a seamer. In some cases, sterilized jars are rolled up without being removed from the water, and then cooled by adding cold water to the pan;
Check the sealed jar for leaks by rolling it several times on the table to make sure that no droplets of pouring appear from under the lid. After that, cool it as recommended in the recipe (read more above in the section “Corking quickly and reliably”).
Do everything in this sequence, but keep in mind that the success of this event will ensure only strict adherence to certain rules.
Rule 1. Banks that you are going to cork with metal screw caps cannot be twisted before heating, as water vapor in the bank will create pressure that can tear off the lid. These caps are screwed on in the same way as regular ones are rolled up - immediately after sterilization is completed.
Rule 2. Glass lids with metal clips can be closed before heating, as the clip allows excess air and water vapor to escape from under the lid during heating. The main thing - remember that you need to fill such jars to a level 2-3 cm below the top of the neck of the jar. During cooling, a vacuum will be created in the jar under the glass lid, which will firmly press the lid with a rubber ring to the neck of the jar.
Rule 3. Remember that the time required to heat water to a boiling point when sterilizing half-liter and liter jars is no more than 15 minutes, three-liter jars- no more than 20 minutes.
Proper sterilization is the basis for a long and successful storage of seams, so it is important to know and follow the basic rules of sterilization. Many make seamings for the winter, and by and large there is nothing difficult both in sterilizing the cans and lids themselves, and in sterilizing cans with blanks. But for those who first decided to make a harvest for the winter, many questions may arise. How to sterilize jars? How many vegetables to put in a jar? How much marinade to pour? How much water should be in the pot? What to take hot jar? And how to sterilize jars with blanks? What is considered sterilization time? These and many other questions of beginners and I will try to answer in this article.
Any preservation begins with the preparation of vegetables and fruits. Wash vegetables thoroughly in cold running water. If these are cucumbers or other vegetables that have had contact with the ground, then washing with a soft brush will not be superfluous.
We put the washed vegetables or fruits in a clean enameled bowl, the water should drain, and the vegetables themselves should dry. Wash the greens no less carefully, a similar requirement for drying.
How to sterilize jars and lids
Before sterilizing, be sure to wash the jars, even if they seem crystal clear to us. Jars and lids are washed with baking soda under running water. If the dishes are heavily soiled, then first wash with kitchen soap, rinse, and only then wash with soda.
The simplest and most trouble-free method of sterilizing jars and lids, which our grandmothers used, is boiling.
So, put a clean pot of water on the fire. Before the jar is dipped in boiling water, we first warm it up so that it does not burst. To do this, we collect a little boiling water in a cup and gently pour water over the jar.
When the jar warms up, place it in boiling water. It is not at all necessary that the jar be placed in a standing position, it is convenient to put it on its side, which is why a wide pan is usually used to sterilize jars. We turn the jar so that it is thoroughly sterilized inside and out from all sides.
We sterilize each jar for 2-3 minutes. In the same water, sterilize the lids for 2-3 minutes.
Carefully remove hot jars from the water, do not leave water inside. Cans usually dry out instantly. We put sterile jars on a clean table. We cover the jars with sterile lids.
How to sterilize jars with blanks
Washed and dried vegetables with clean hands are tightly packed in jars to the line of the coat hanger. Blanks can not be stacked to the very top, you should always leave a gap of at least one and a half to two centimeters. This is due to the fact that when heated, all bodies increase in volume (ordinary physics). If you lay it to the very top, then during sterilization the contents of the jar will begin to pour out.
We cover the jars with lids to avoid dust, midges, villi, human saliva, etc. getting inside.
We prepare the marinade, as indicated in the selected recipe. Usually 1.5 cups of marinade goes to a liter jar, but less can go, depending on how tightly the vegetables are packed. It should be remembered that sea, iodized, as well as Extra salt is not suitable for seaming. We take ordinary rock salt. The marinade should boil well.
If indicated in the recipe, then first pour the vinegar into the jar, and then the marinade.
Pour the boiling marinade into a jar of vegetables, be sure to leave a gap of one and a half to two centimeters, while the marinade should cover the vegetables. We cover the jar with a lid.
Usually, the marinade is not poured into all jars at once, but one by one. This means: pour the marinade into the first jar with the workpiece, cover with a lid, set to sterilize in boiling water. Then pour the marinade into a second jar, cover with a lid and put in a saucepan, then a third, and so on as many times as there are jars.
After sterilization and seaming of the first batch of jars with blanks, we repeat the whole process for the second batch: we prepare (boil) the marinade, fill it in turn and set to sterilize.
What you need to sterilize jars with blanks
For sterilization by boiling, a fairly large and wide pan is usually used, in which several cans / bottles can be placed. We pour the required amount of water into it, which we measure in advance, knowledge of the law of Archimedes is just useful here. We put the pot on the fire.
When the water boils, put a clean towel on the bottom to avoid direct contact of the glass with the hot bottom of the pan.
We put the jars with the workpiece on a towel. Pay attention to the level of water in the pan. Water should not reach the neck of the jars by about 2 centimeters.
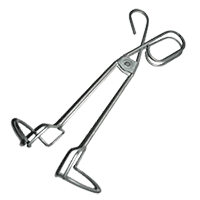
We put the jars in and take them out of boiling water with the help of special tongs, which are called “tongs on a can for conservation”. It is desirable to purchase them, especially since they are inexpensive. It is convenient to grasp hot jars with these tongs, which greatly simplifies the task of sterilization.
What is considered sterilization time
After we put the jars with blanks in a pot of water, increase the fire. When the water in the pan boils again, we note the time. This will be the start of the sterilization time. The water in the pan should boil, but in no case should it get inside the cans, so we adjust the fire in a timely manner.
In what order to remove and roll up jars after sterilization
We take out the jars from boiling water in the same order in which they put them in the pan. First we take out the one that was set to be sterilized first, and immediately roll it up. We take out the second jar, roll it up, put the lid down, take out the third, etc.
If you take all the jars out of boiling water at once and only then roll them up, then the sterility of the workpiece may be violated, because no matter how quickly you roll up, the last jars will still have time to cool down and pick up non-sterile air from outside.
Can jars and lids be sterilized in the oven
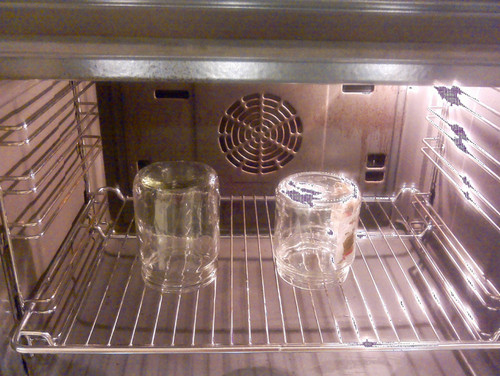
Yes, jars can be sterilized in the oven, but first they should be thoroughly washed with soda, and only then sterilized. We put the washed dishes (without cracks and damage) in a warm oven. Gradually increase the temperature of the oven to 150 degrees Celsius. We sterilize liter and half liter jars for 15 minutes. We sterilize 3-liter jars for 25 minutes.
Is it easy to learn how to cook delicious food?
There are two main, most common ways to sterilize jars directly with seams. This is the processing of cans with blanks in boiling water or in an oven.
As part of this material, all questions and important points will be considered on how to sterilize jars in an electric oven with blanks. One of the safest ways to sterilize jars, which is very popular with housewives. Here you will learn how to sterilize jars with blanks in an electric oven.
Advantages of sterilizing jars with blanks in an electric oven.
There are many methods of sterilization. Now I will tell you how to sterilize jars in the oven with blanks. This method is the most convenient. Sterilization of blanks is divided into 2 stages. Stage 1 sterilization of empty jars and lids, Stage 2 sterilization of finished products.
How to prepare jars and lids for sterilization
Stage 1 - Preparation of jars for sterilization
A mandatory sterilization rule is the cleanliness of the jar and lid! Regardless of which preservation recipe is chosen: jam, salads, compotes, sterilizing empty jars is a must.
It seems to many that this process is complex and rather tricky, although, in fact, it is simple and competently takes a minimum of time.
The easiest process to sterilize empty glass jars is to use an oven.
A mandatory element of seaming is not only a clean and sterilized jar, but also a lid. The lids cannot be sterilized either in the oven or in microwave oven. But it will be enough to boil them in water for a quarter of an hour.

We know how to sterilize jars and lids, and our blanks will stand for a long time! But that's not all, you need to perform the main sterilization of cans with blanks in an electric oven.
Sterilization of jars with blanks in an electric oven.
Sometimes the recipe provides for the sterilization of cans with blanks. Many homemade recipes call for sterilizing vegetables or salads in a jar. This procedure can also be easily carried out in the oven. This can be done without much difficulty. The meaning of the action is the complete destruction of all bacteria and fungi that can spoil canned foods and harm human health.
If you need to roll up a salad for the winter in sterilized jars, which also passed heat treatment- Place hot contents in warm jars. In the event that the contents of the jar are cold, do not forget to cool the jar so that it does not burst. You can leave the jar unused for a while, just turn it upside down on a clean towel. Sterilization of jars with blanks in the oven is carried out only on condition that the containers are intact - without chips and cracks.
They put the necessary pickles, jams or marinades in the jar. We do not cover jars with blanks with lids.
In the oven, containers are placed on a wire rack or on a tray. We put the banks in such a way that they do not touch each other.

Summer is a period of intensive harvesting of seasonal fruits and vegetables.
Summer is a period of intensive harvesting of seasonal fruits and vegetables. In the course of such work important place the question is how to sterilize jars at home.
The main task of home preservation at all times remains the preservation of blanks in a state that does not allow the development of botulism or spoilage of processed products. There are many ways to pre-prepare canned food for sealing, convincing us that sterilizing jars at home is a real thing and not always laborious.
Some of them allow you to sterilize jars without contents, others are designed to pasteurize canned food in a container.
Empty jars are easier to sterilize, but this way canned food reacts more with air and non-sterile items, which can lead to the formation of finished products mold and harmful microorganisms.
To choose the most appropriate method of sterilization, you should know all the subtleties of each. Do you know how to sterilize jars in the oven? Have you tried it in the microwave? My lg microwave works great. I will share with you all the secrets.
The advantages of sterilizing jars in the oven are that there is no unnecessary moisture left in the container, and clouds of steam do not hover in the apartment. With a large oven, several cans are placed in the oven, depending on the size of the container.
Main questions arising from an inexperienced housewife when choosing this method of pretreatment of dishes for canning and their answers:
How to sterilize jars in the oven?
Sterilizing jars is a very important process.
Place the thoroughly washed and fat-free dishes in a cold oven, and the jars big size put on the side. Containers should be placed on a wire rack or in a baking sheet with a small amount of water so that the heated sheet does not spoil the cans. In the case of a baking sheet, it is better to sterilize small jars, half filled with water and placed vertically on a sheet.
How long does it take to sterilize jars in the oven? - 10 minutes is enough after the device reaches a temperature of 100 degrees - it is on this figure that the thermostat control should be set.
How to sterilize jars with blanks in the oven? - It all depends on the type of blanks. If you want to consolidate the result in the preparation of jam or marmalade, you should keep jars of treats until a film forms on the surface of the dessert. If snacks or preparations for first courses need additional sterilization, the time indicated in the recipe is enough. In the case of marinades or canning vegetables, a third of an hour is enough at the same 100 degrees.
Sterilizing jars in the microwave
If in the arsenal of a housewife there is microwave, a sterile product is very easy to obtain.
![]()
Sterilizing jars in the microwave is very easy.
You can sterilize jars in the microwave both dry and wet. Sterilizing jars in the microwave speed up the preparation process Seaming containers, although more energy-intensive in terms of electricity. The main questions, the answers to which will help reduce the loss of time and packaging to a minimum:
How to sterilize jars in the microwave? – Thoroughly wash dishes of the required volume, degrease with baking soda and rinse in plenty of water. Pour half a glass of filtered or boiled water into each jar to avoid the formation of limescale on the walls of the dishes. Lay a cloth on the microwave plate. Place containers filled with water on top. Turn on the microwave at a power of 700-800 watts. Sterilize the container in the microwave, so it should not take more than 5 minutes. After the end of the process, open the door, release the resulting steam and take out the sterilized inventory with a potholder or towel.
Attention! The fabric must be absolutely dry, otherwise the difference in temperature will damage the container.
You can sterilize jars in the microwave to get absolutely dry, clean dishes. To do this, next to the empty containers, you should put a glass, one-third filled with water. In this case, the process lasts exactly as long as it takes for the liquid to completely evaporate from the glass.
How is pasteurization of cans in the microwave carried out if additional heat treatment is required by the recipe? - Must be completed necessary product a container of the right size, for example, cucumbers and spices, pour the marinade without vinegar up to half the jar, put in the microwave on a towel. Turn on the unit at full power for 5 minutes. take out finished product and add boiling brine with vinegar.
The disadvantage of this method is that metal lids for rolling canned food have to be sterilized separately - as you know, the microwave does not like iron (better not experiment: an explosion in a microwave oven due to a lid is not a warranty case).
Preparing jars for steam
The oldest way to sterilize canning containers, tried and tested by generations of home canners. Thus, the dishes on small saucepans, on the kettle and even on its spout are disinfected.
Follow all the instructions to delight yourself in the winter with delicious preservation
In this case, the question usually arises of how much to steam jars to sterilize. It all depends on the volume of the container - five minutes is enough for half-liter ones, and at least a quarter of an hour for three-liter ones.
A special device for sterilization is installed on the neck of the kettle, which is sold in the household departments of supermarkets or in stores selling household goods, a container is placed upside down. This whole structure is built on a stove, the process time is counted from the moment the water boils in a saucepan or kettle.
Using this method of preparing dishes for canning is most suitable for recipes that are marked - without sterilization. For salads and snacks, it is better not to use it. It is better to put a hot product in such jars and seal it immediately so that the cooling process occurs as slowly as possible.
Preparation of containers in boiling water.
You can boil jars in water, then the amount of steam filling the room is significantly reduced, since in this case it is quite appropriate to use a lid.
There is only one question here - how many minutes to sterilize jars in a pot of water? The time here is the same for both large and small vessels, it is about 10 minutes, counted after the liquid boils.
It is necessary to lay linen fabric in several layers on the bottom of the pan or put a special grate, put jars filled with water on it and turn on the fire. After the specified time, drain the boiling water from the jars and immediately fill them with preservation and roll up.
This method is rarely used, it is mainly used for additional preparation of capricious products - green peas, beans or mushrooms. Here you need to know how to sterilize jars with blanks:
- Cover the bottom of the sterilization container with a linen cloth folded in 2-3 layers. You can use a wooden grate or a special silicone mat for this purpose.
- Put filled containers on a substrate, cover with metal lids.
- Pour cold water into the container with canned food to the “shoulders” of the cans.
- Bring the water surrounding the canned food to a boil.
- Keep the product on the stove for as long as necessary according to the time specified in the recipe.
Pasteurization is the heat treatment of homemade products at a temperature of approximately 85-90 degrees, which is carried out in order to preserve preservation as long as possible.
The presence of high acidity contributes to the preservation of canned food prepared by the pasteurization method and their safe consumption.
The death of harmful microorganisms occurs not only from heating, but also from the presence of acid in the product or the liquid being poured.
It has been scientifically proven that bacteria die faster from the cell sap of some fruit berries.
In this case, it makes no sense to heat them up to 100 degrees, destroying vitamins and distorting the taste of the product.
You can pasteurize cherries, sour apples, unripe apricots and other sour fruits for jams and compotes, as well as vegetable salads, lecho, caviar, and other marinades.
Important Rules for Pasteurization
The most important question that housewives ask is: to roll up or not to roll up jars before pasteurization?
In no case, because when heated, the product expands, and the pressure will tear off the lids.
If you use lids with clips, then they close the jars immediately, before pasteurization.
The clamp allows excess air and water vapor to escape from under the lid during heating, and during cooling, a vacuum is created in the jar under the glass lid, which tightly presses the lid with a rubber ring to the neck of the jar.
First, a rubber ring is applied, the tightness of its fit to the edges of the neck is checked, then the jar is covered with a lid and then a special metal clip is put on.
In this case, it is important not to disturb the position of the rubber sealing ring.
Jars sealed with lids with clips are immersed in water completely so that they are covered with water by about 2 cm.
Preparing the container for pasteurization is one of the most important things.
1. Water must reach the level of the contents, that is, approximately up to the shoulders of the jar, but not less than 3 cm from its top!
2. You can not put the jars directly on the bottom of the pan, the fire is close there, and the jars will burst.
You need to put a silicone mat, a wooden or metal grid or a stand (2.5-3 cm high) with holes on the bottom, and a piece of cloth on top, or just a towel folded in 4 layers.
Also banks should not touch each other.
3. Canned food in jars or bottles of only one size is pasteurized in one pan.
4. You need to heat the water in a pot with jars quickly so that the products do not overcook.
5. Pasteurization time depends on the volume of jars.
According to all the rules, you need to insert a thermometer with a probe into one of the jars and wait until the temperature rises to 80-90 degrees or to the temperature indicated in the recipe.
The duration of pasteurization is counted from the moment this temperature is reached.
It is believed that it takes no more than 15 minutes to pasteurize blanks for half liter jars and bottles, 20-25 minutes for one- and two-liter bottles, 25-30 minutes for three-liter bottles.
Vegetable salads fried in oil are pasteurized a little longer.
How to pasteurize jars with blanks
1. Sterilize the jars and hold the metal lids in boiling water for about a minute.
2. Place hot (!) blanks in them.
Some salads are packed cold in jars, depending on the recipe. They also need to be immersed in water with a temperature not exceeding 35 degrees.
3. Put the jars in a large bowl with water heated to 50-70 degrees. In doing so, follow the rules described above.
To prevent glass containers from bursting, the water temperature should not be higher than the temperature of canned food.
4. Cover with lids, bring to desired temperature and you can pasteurize the time specified in the recipe, maintaining the required temperature.
5. Carefully remove the jars one at a time and immediately roll up, then turn over and take out to fresh air to cool faster.